How do I make a collection?
Collections are used to group relevant courses together, simplify enrolments and organise reporting.
2. Edit the Collection Settings
Learn more about how collections can be used here.
Create a Collection
You can easily create a collection from the Content page by clicking on Create new...
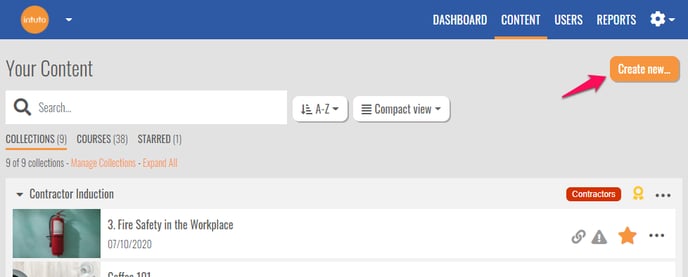
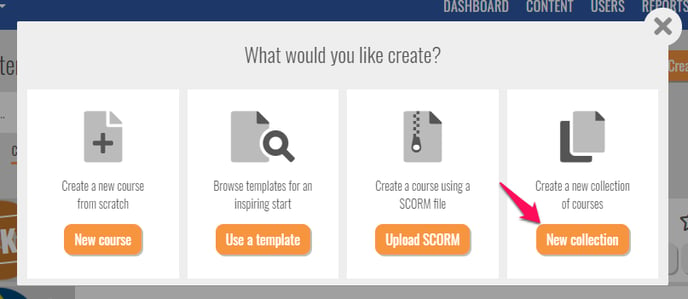
This will bring up a set of creation options, click New collection.
If you would like to use an existing collection as a base you can copy it from the Collections page in your site settings. Click the pencil icon to the right of the colelction oyu would like to copy. 
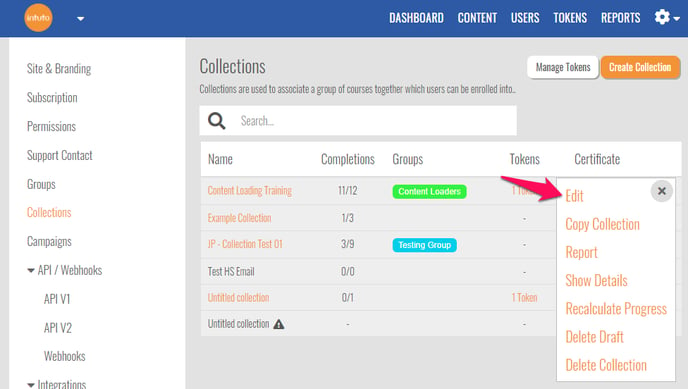
Then click Copy Collection.
You'll see the following popup. Confirm you want to copy the collection by clicking Copy Collection.

You'll then be taken into the Collection Editor to make changes as needed.
Editing your collection
If you have created a new collection following the steps above, you will be taken directly into the collection editor.
If you would like to edit an existing collection, go to the collections tab in your settings and hover over the name of the collection you would like to edit to show the pencil icon.
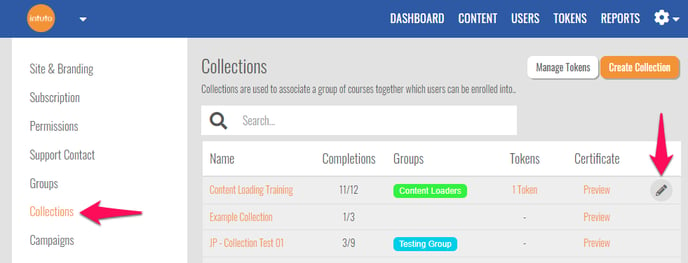
Click the pencil icon to see a list of actions, and click Edit to access the collection editor.
The Collection Editor
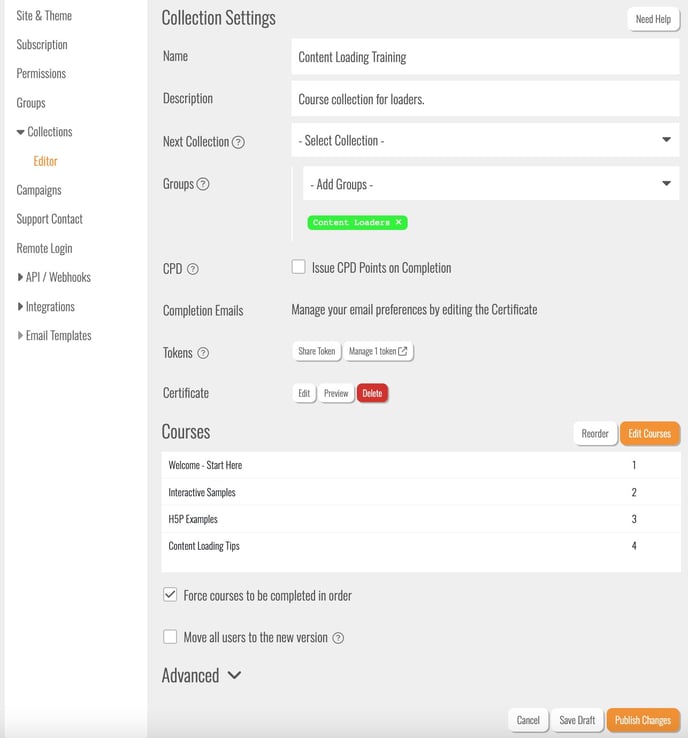
The Collection Editor contains the following:
- Name - The name of your collection. This is how users will identify the collection and how it will appear on any emails or certificates.
- Description - This is an optional field.
- Next Collection - You can choose a collection for users to be enrolled into once they complete this collection. This is a great way to create a learning pathway and to automate your administration. This setting is only available when more than one collection exists.
- Groups - Adding a group will automatically enrol all users in that group (or selection of groups) into the collection. Note that users need to belong to ALL groups selected to be automatically enrolled, so if groups 1, 2 and 3 are added, users will need to be in all three groups to be enrolled. Learn more about groups here.
- CPD Points - You can add CPD points to be awarded upon completion. Tick the box to Issue CPD points on Completion, and then enter the number of CPD points to be awarded. Learn more about CPD points here.
- Completion Emails - From the certificate editor you can choose to have a completion notification email sent to a designated email address whenever a user completes the collection.
- Tokens - A token is link to the collection for users to self enrol. You can add a token to the collection, or if you are using the full Tokens feature you can access the token manager from here. You can learn more about the full Tokens feature here.
- Add Certificate - You can add a certificate to a collection. Find out more about certificates here.
- Courses - This is where you will see the courses in your collection. Click Edit Courses to see a popup where you can select the courses you want in the collection.
- Force courses to be completed in order - This will allow you to control the order in which the courses in the collection are completed. When this option is selected you will see a number to the right of each course and a Reorder button will appear for you to change the order of the courses if needed. If this option is selected a user will initially gain access to only the first course in the collection. Once they have completed the first course they will gain access to the second course, and so on.
- Move all users to the new version: If you are editing your collection and want all users to be moved to the latest version, you can tick this box before publishing. If you have a certificate associated with the collection that users have completed, this may be removed/reissued depending on the current status of your users. Please contact us to discuss this action if you have any questions.
Advanced Settings
- Send Follow Up Emails - If you have information that needs to be conveyed to your users after they successfully complete a collection, you can set up a follow up email to be sent an hour after completion is recorded. You can edit the follow up email from the Custom Emails tab. Learn more about Custom Emails here.
Once you are happy with your settings, you can click Publish Changes to publish the collection.
Share your Collection
Once a Collection is published, you have a few options for how to share it with your users:
- You can enrol your existing users into your collection from the Users page. Learn about enrolling existing users here.
- You can upload new users to your site by doing a bulk upload. Learn more about bulk uploads here.
- You can also share your collection by using a Token that can be generated from the Collection Editor page. In your collection list you will see a code in the Token column. Click this code to get a link to your collection that you can share.
 Anyone that clicks on this link will be able to create an account on your Intuto site and access this collection.
Contact us at support@intuto.com for more help with Collections.