User Groups
Users can be put into groups to help with visibility on your site and to automate some admin processes.
A group will show as a coloured and labelled tag in the site, allowing you to easily see which group each user is a part of.

Groups can be used however will best suit your organisation, with some common types being:
- Location e.g. state, city, or office name
- Role e.g. warehouse, head office, sales team
- Intake e.g. 2021 Q1
Groups can also be used to automate some admin processes, such as automatically enrolling users into collections, or updating profiles in bulk. Find out more about using groups here.
Each user can have multiple groups assigned, allowing you to see layers of information at a glance. Your users will be able to see any groups they are in on their profile, but will not be able to see any information about other people in their groups.
Learn how to:
Creating or Editing a Group
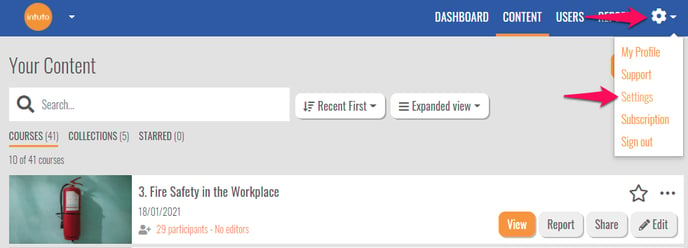
You can create and edit groups in your settings page. Click the cog icon in the top right and click Settings.
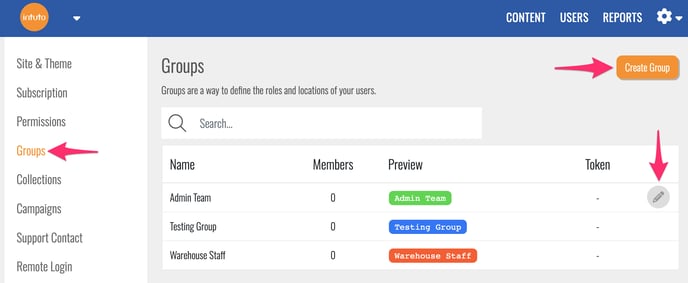
Click Groups in the list on the left hand side to view your Groups, then click Create group to create a new group or use the pencil icon to edit an existing group.
In the Group Editor you'll be able to enter or edit the name of your group, this is a free text field and can also be edited later.
You can then pick a colour for the group label using either a hex code # or by clicking on the coloured square, selecting a colour and using the Pick Colour button to confirm your selection.
Once you have updated the name and colour of your group you'll see a preview of your group tag in the Preview section.
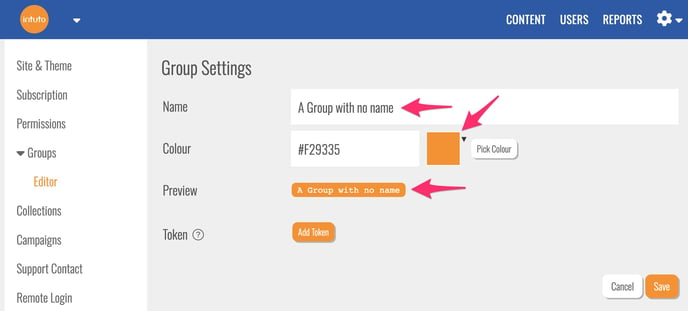
When creating a group, you can also add a Token to the group. A Token is a URL or link that can be shared with your learners to self-register to your site. A group token will allow users to register themselves into a specific group on your site. You can learn more about Tokens here.
Note: If you have a Group Token for a Group that is not associated with a Collection, your users will be added to your site without being enrolled into any training.
Adding Users to a Group
You can add users to a group individually, in multiple lots, or in bulk, from the Users page.
Individually:
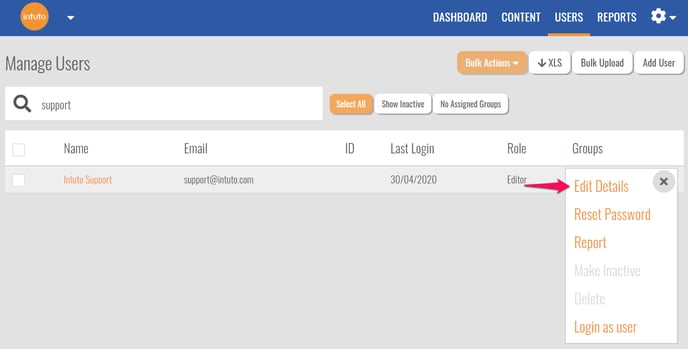
Find a user on your Users page and click the pencil icon to the right hand side of their name.

Click Edit Details in the menu that appears.
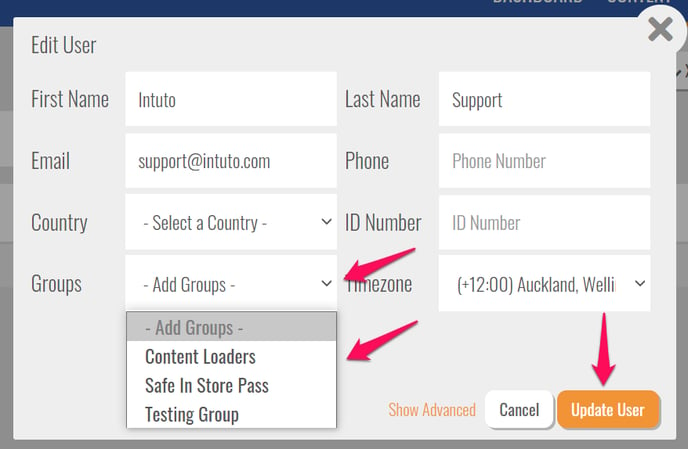
You will see the following pop up. Use the Groups drop down box to select groups to add the user to. Once you are happy with the groups, click Update User to save your changes.
Multiple Users:
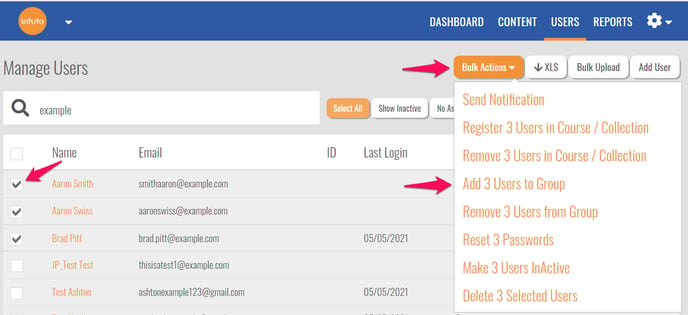
On the Users page, find and select the users you want to add to a group by ticking the box to the left of each name. Then click Bulk Actions and select Add * Users to Group.
You will see the following pop up.
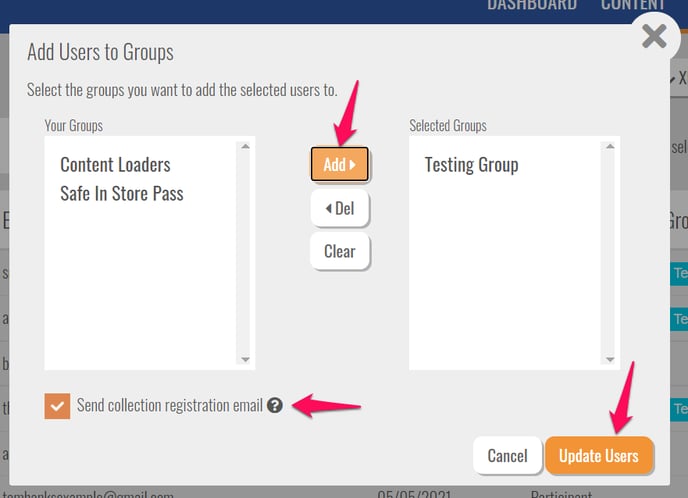
Use the Add>, <Del and Clear buttons to move the desired groups to the Selected Groups box. Use the Send collection registration email tick box to decide if you want to send an email for any collections associated with the groups you are enrolling the users into. Learn more about automatically enrolling using groups here.
Once you are happy with the groups you are going to add users into, click Update Users. You will then see the group tag added to the selected users on your user page and in any reports.
In Bulk:
You can add or update multiple user profiles at a time by performing a Bulk Upload and using the optional addgroup column. If you are updating existing users, make sure you select Update Existing User Profiles in the Bulk Upload settings.
You can learn how to perform a Bulk Upload here.
By Token:
Your users can add themselves to groups through a Token. Add a Token to an existing Group through the Group Editor as discussed earlier in this article. Share this Token URL/Link to your users and they can register into the group.
Remove users from a Group
You can remove users to a group individually, in multiple lots, or in bulk, from the Users page.
Individually:
Find a user on your Users page and click the pencil icon to the right hand side of their name.

Click Edit Details in the menu that appears.

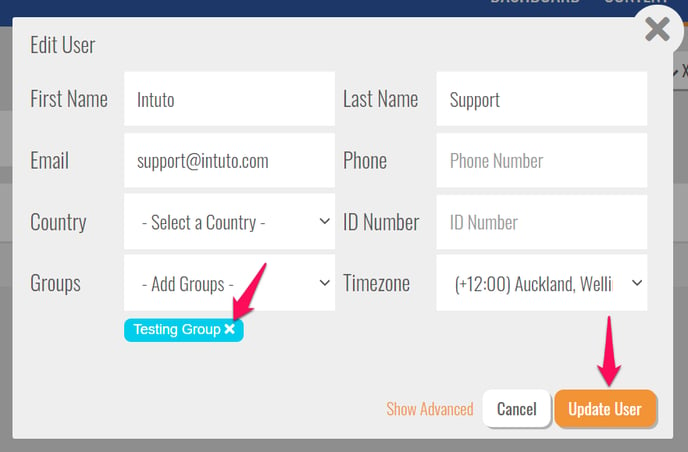
You will see the following pop up. Click the X on any group that you want to remove, then click Update User to save your changes.
Multiple Users:
On the Users page, find and select the users you want to remove from a group by ticking the box to the left of each name. Then click Bulk Actions and select Remove * Users from Group.
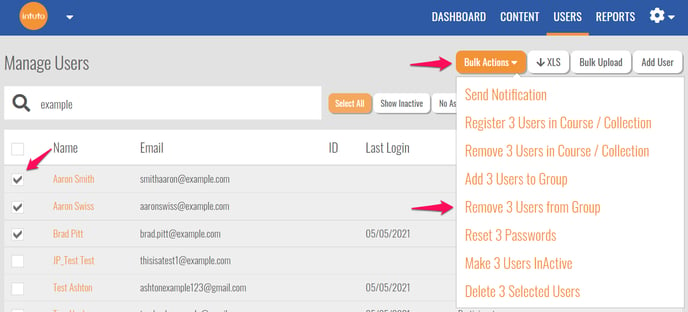
You will see the following pop up.
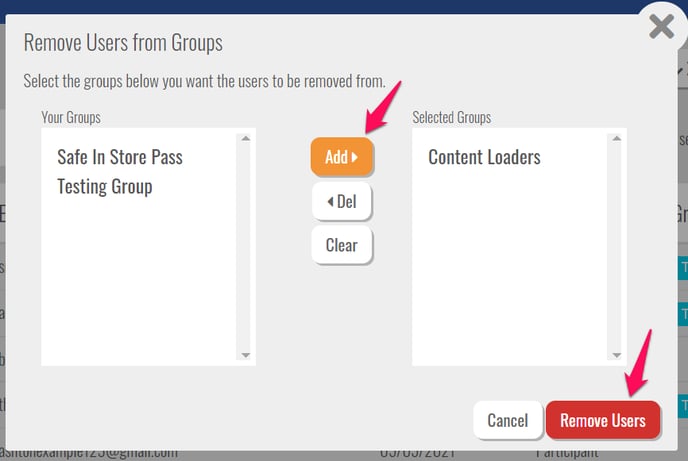
Use the Add>, <Del and Clear buttons to move the desired groups to the Selected Groups box.
Once you are happy with the groups you are going to remove users from, click Update Users. Your users will then be removed from the groups you selected.
In Bulk:
You can remove a group from multiple user profiles at a time by performing a Bulk Upload and using the optional removegroup column. If you are updating existing users, make sure you select Update Existing User Profiles in the Bulk Upload settings.
You can learn how to perform a Bulk Upload here.
Contact us at support@intuto.com for help or more information about groups.