![Intuto-Logo-2019-RGB-600x600px-transparent.png]](https://support.intuto.com/hs-fs/hubfs/website/assets/img/logos/Intuto-Logo-2019-RGB-600x600px-transparent.png?width=40&height=40&name=Intuto-Logo-2019-RGB-600x600px-transparent.png)
By default, your learners can log in with an Intuto password, Google or Facebook - all three appear on your login page straight away. If your learners log in through another system, you can also set up SSO using OIDC and SAML.
You can:Note: SSO is a feature that needs to be turned on for your site. Please contact support@intuto.com to have SSO turned on for your site.
Choose Your Login Methods
To access your SSO settings and choose your login methods, use the cog icon in the top right of your Intuto site to access your Settings. Select Integrations on the left, and then click Configure on the SSO section.
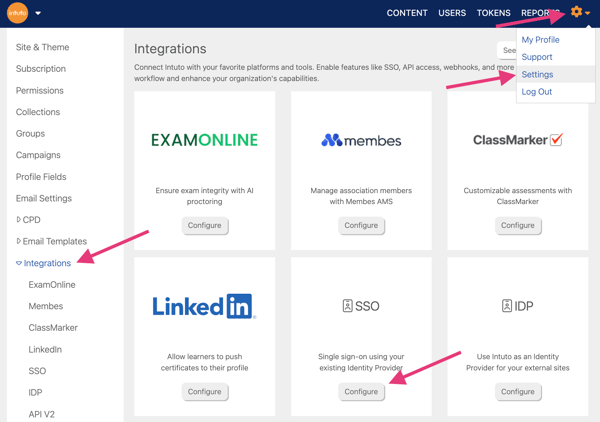
You'll then see the following page containing each of the login options.
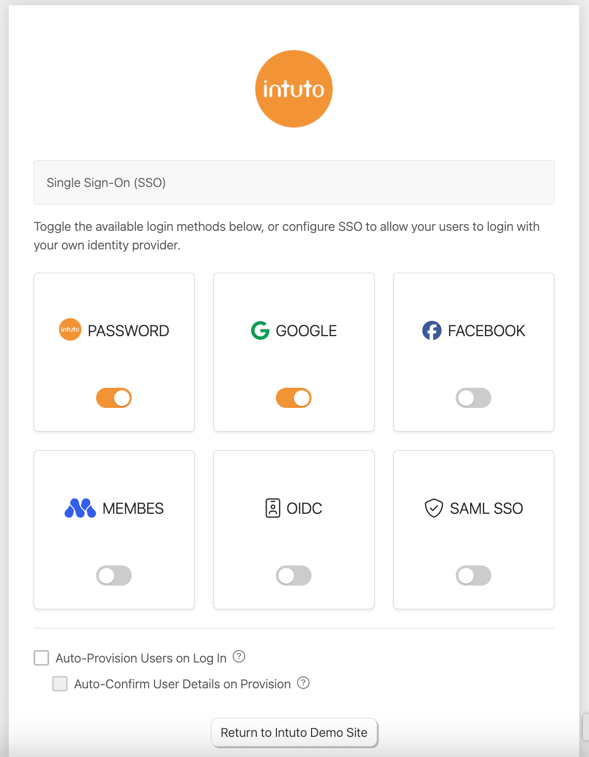
Password, Google and Facebook are all standard options, so you can turn these on or off as desired. Membes, OIDC and SAML all require additional details. You can see how to set these up below.
Note: If you turn the Password option off, learners will not be able to log in via their Intuto passwords and must use another login option. We recommend keeping this turned on until your other login options have been set up and tested.
Additional Settings
At the bottom of the Single Sign-On (SSO) page, you'll find two extra options for people logging in for the first time:
- Auto-Provision Users on Log In - Automatically create an Intuto account for anyone who successfully logs in through your SSO provider, so you don't need to add them first.
- Auto-Confirm User Details on Provision - Available once auto-provisioning is ticked. This will skip the step where new users confirm their details if all of the information is provided through the SSO handshake.
Auto-provisioning works well if everyone who can log in to your identity provider should have access to your learning. If you'd rather control exactly who gets in, leave it unticked and add or bulk upload users from the Users page.
Set Up Membes SSO
If your association uses Membes, your members can log in to Intuto with their Membes account details. Turn on the Membes option to open the Membes SSO settings. You'll need a few details from Membes - you can see the Membes SSO documentation here.
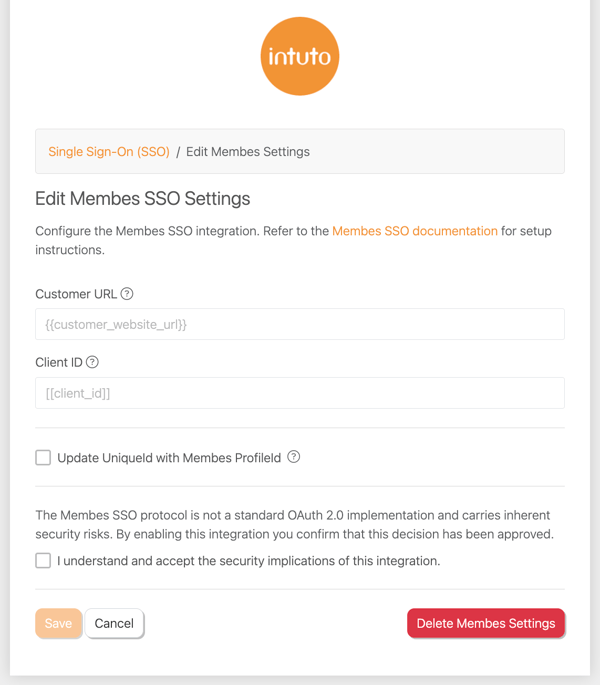
The Membes SSO settings contain the following fields and options:
- Customer URL - The base URL of your Membes account, referred to as in the Membes documentation.
- Client ID - Your Client ID provided by Membes, referred to as [[client id]] in the Membes documentation.
- Update UniqueId with Membes ProfileId - Tick this to map the Membes ProfileID to the UniqueID field in Intuto.
- I understand and accept the security implications of this integration - The Membes SSO protocol isn't a standard OAuth 2.0 implementation, so it carries some security risks. Ticking this box confirms the decision has been approved within your organisation.
Once you have configured the settings, click Save at the bottom of the page to turn on the Membes SSO login option.
Note: Membes will also need Intuto's redirect URL. Please contact support@intuto.com for the details.
Set Up OIDC SSO
OIDC (OpenID Connect) lets you connect Intuto to your own identity provider, such as Microsoft Entra ID (Azure AD), Okta or Auth0.
Turn on the OIDC option to open the OIDC SSO settings. It's a good idea to have your IT team or identity provider's documentation open for the values below.
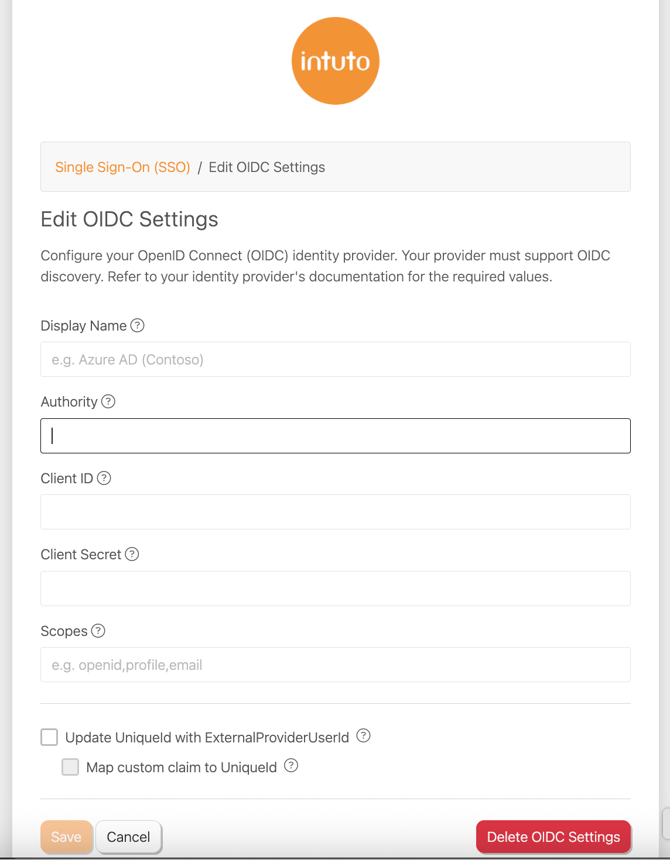
The OIDC SSO settings contain the following fields and options:
-
Display Name - The name of the login button your learners will see, e.g. Microsoft
-
Authority - The base URL of your identity provider (issuer). It tells your app where to send users for login and where to fetch tokens.
-
Client ID - The application's public identifier registered with the identity provider.
-
Client Secret - A confidential key assigned to your app by the identity provider.
-
Scopes - A comma-separated list of the user information Intuto requests, e.g. openid,profile,email.
-
Update UniqueId with ExternalProviderUserId - Tick this to update your user accounts in Intuto with their user ID in your identity provider.
-
Map custom claim to UniqueId - Available once the option above is ticked. Use this if you'd like to update user accounts with a different claim from your provider, such as an employee or member number.
Once you have confiirgured the settings, click Save at the bottom of the page to turn on the OIDC SSO login option.
Note: Your identity provider will also need Intuto's redirect URL when you register the app. Please contact support@intuto.com for the redirect URL.
Set Up SAML SSO
If your organisation uses SAML for single sign-on, we can connect it to Intuto. SAML set-ups vary between providers, so please get in touch with us at support@intuto.com to discuss the set-up requirements.
For further support with SSO, please contact us at support@intuto.com.